Visit Information
- 30 Aug 2024
- 4 Minutes to read
- Print
- DarkLight
- PDF
Visit Information
- Updated on 30 Aug 2024
- 4 Minutes to read
- Print
- DarkLight
- PDF
Article summary
Did you find this summary helpful?
Thank you for your feedback!
This article will go over the Visit Information screen that you can access from several screens in Service Twin, and what type of information about the visit it can show you.
Accessing the Visit Information screen
You can access detailed information about a visit from the following three (3) screens:
1. Visit Home Screen
At the top of the visit's home screen, you will see a Visit Info button. Tap on this to access the Visit Information screen.
Enhanced Job Details View:
You can view job details conveniently here. Billing information is readily accessible through the Visit Info slideout, displaying essential billing data such as Customer, Billing Contacts, Site Contact and Contact email for quick reference. You can also view Tech Notes here. To view the Visit Info, click on the 3 dots next to the building name.

You access a web-based job report directly from Visit details by clicking on the Job number. This feature allows for actions like collecting signatures and provides a comprehensive view of job-related information.
.PNG "IMG_0860(1).PNG")

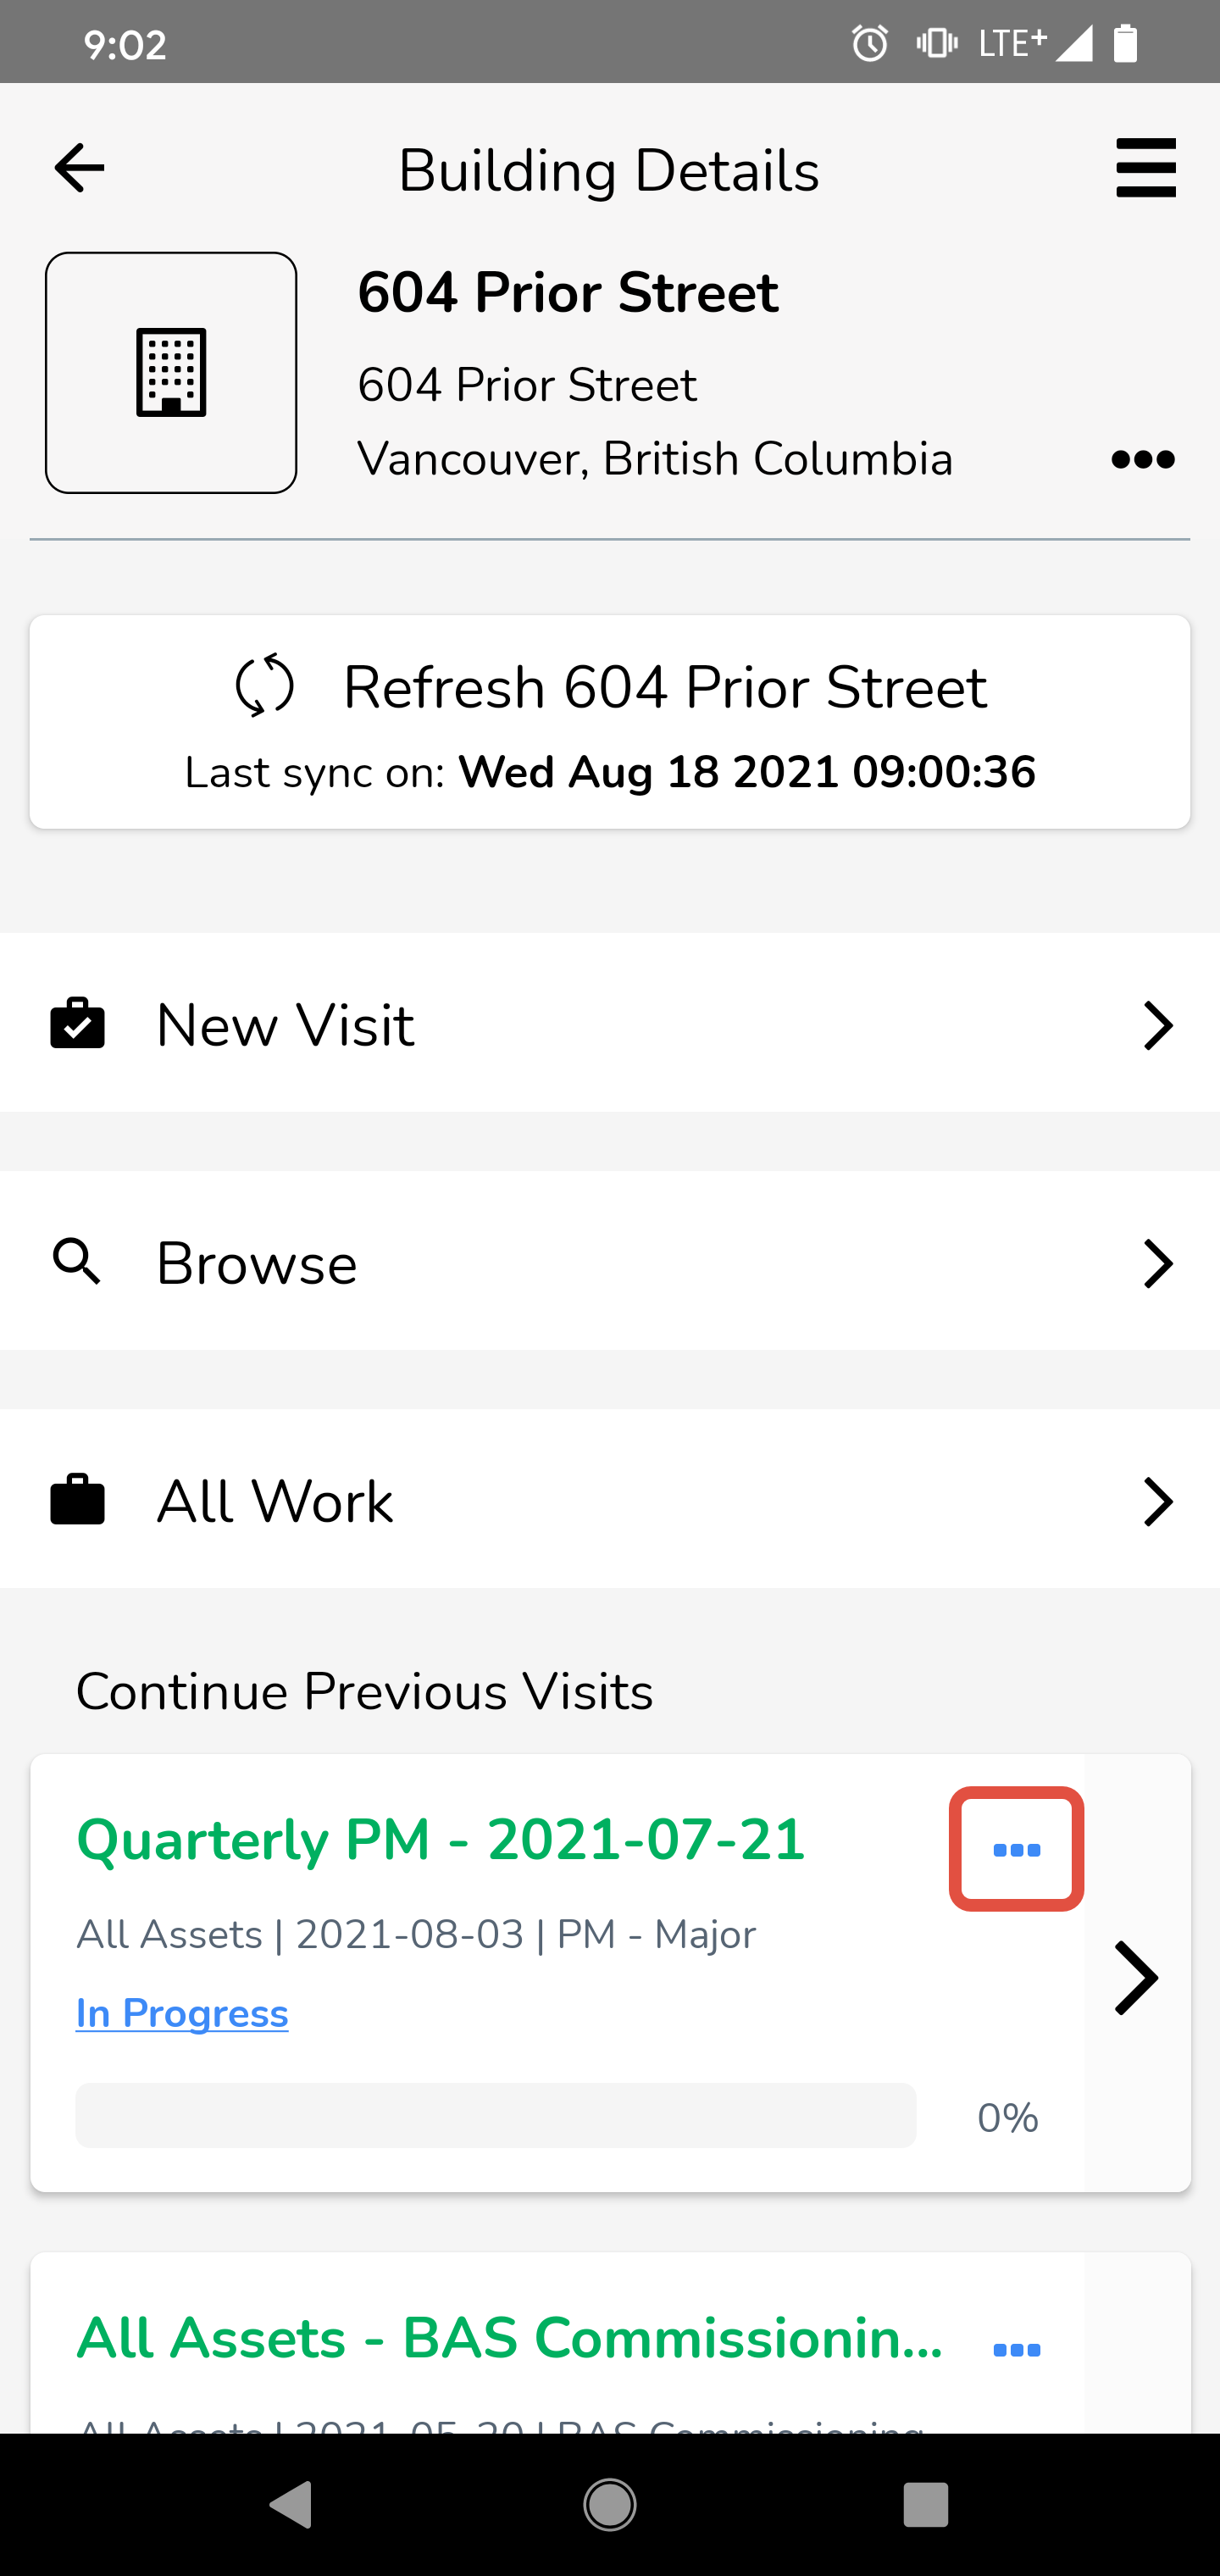
From the Building Details screen, if you have any visits that haven't been completed, you will see a Continue Previous Visits section at the bottom below the main navigation. From here, you can simply tap the blue "..." icon to access the Visit Information screen.
3. From the main Inspection Info pull-up during an inspection in a visit
During an inspection, you will see a blue bar at the bottom. This is the Inspection Info pull-up bar. When you open this, you will see all kinds of information that may be useful to you while you are performing your work. Scroll down until you see the Visit section. From here, simply tap the three blue dots to access the Visit Information screen.

Visit Information Overview
The Visit Information screen will give you all the information you need about the visit you're on. The screenshot and text below will explain each item in more detail.

A - Live Sync
If a visit includes subtasks, it becomes a "LiveSync" visit, meaning the task list is automatically synced in real-time across all devices. Without subtasks, the visit is "local," and progress tracking occurs only on your device, with no synchronization to other technicians' devices.
B - Visit Title
This is the title of the visit, which is either a manually typed title or a combination of some of the more important fields (asset group, work category and start date).
C - Detailed Information
All the important information about the visit can be found here. Here is each field explained in more detail:
Assigned to - indicates the technician to whom the Visit is assigned. You can change the assigned technician here to another user in the Org.
Materials - check this field to see whether there were any materials added prior to the visit. Click here for more information on checking for materials.
Asset Group - indicates the group of assets that is being inspected in this visit.
Category - the work category of the visit. This is a custom list managed by administrators in your office and is typically comprised of items such as Service, PM Major, PM Minor, etc.
Job # - quickly find out which job number is assigned to this visit.
Start Date - the date the visit was scheduled to be started.
Due Date - the due date of the visit.
Hrs/Cost - the Estimated Hours and Costs for this Visit as set by the Office Admin.
Modified - the date when the visit was last modified.
Modified By - the person who last modified this Visit.
D - Change Status
Use this to change the:
Status of the Visit - Status options are: Open, In Progress, Waiting, Completed, Closed, Cancelled.
Reason of the Status - Status reasons are set by the Org admin on the Admin Portal. For example reasons for closing a Visit can be: Holiday, Sick, Work Not Needed etc.
E - Progress Tracker
See the Progress of the visit in this box. The number on the left indicates the total number of assets that the visit came with. The number on the right shows how many are still remaining to be inspected before the visit is completed. The blue bar below the numbers will fill up as you complete more assets.
F - Restart Visit
Use this to restart (i.e. reset) the visit. See more about this below.
Restarting a Visit
Depending on some circumstances, there may be a need to restart a visit. Restarting a visit means resetting the list of assets that has already been completed and starting over. Please review the note below detailing the conditions that allow for restarting a visit.
Note!
Restart Visits: Restarting only resets the local progress tracking of the visit. It doesn't affect tasks that are already closed on the server.
Local Visit (No LiveSync): When in a local visit (without LiveSync), restarting works in a straightforward manner—everything comes back. However, any work that has already been submitted remains on the server.
LiveSync Visit:
Tasks that have been "locally closed" (not yet submitted) will return when you restart the visit.
Tasks that have already been submitted and closed on the server will not return when you restart a LiveSync visit.
The screenshot below shows the steps to take to restart a visit.
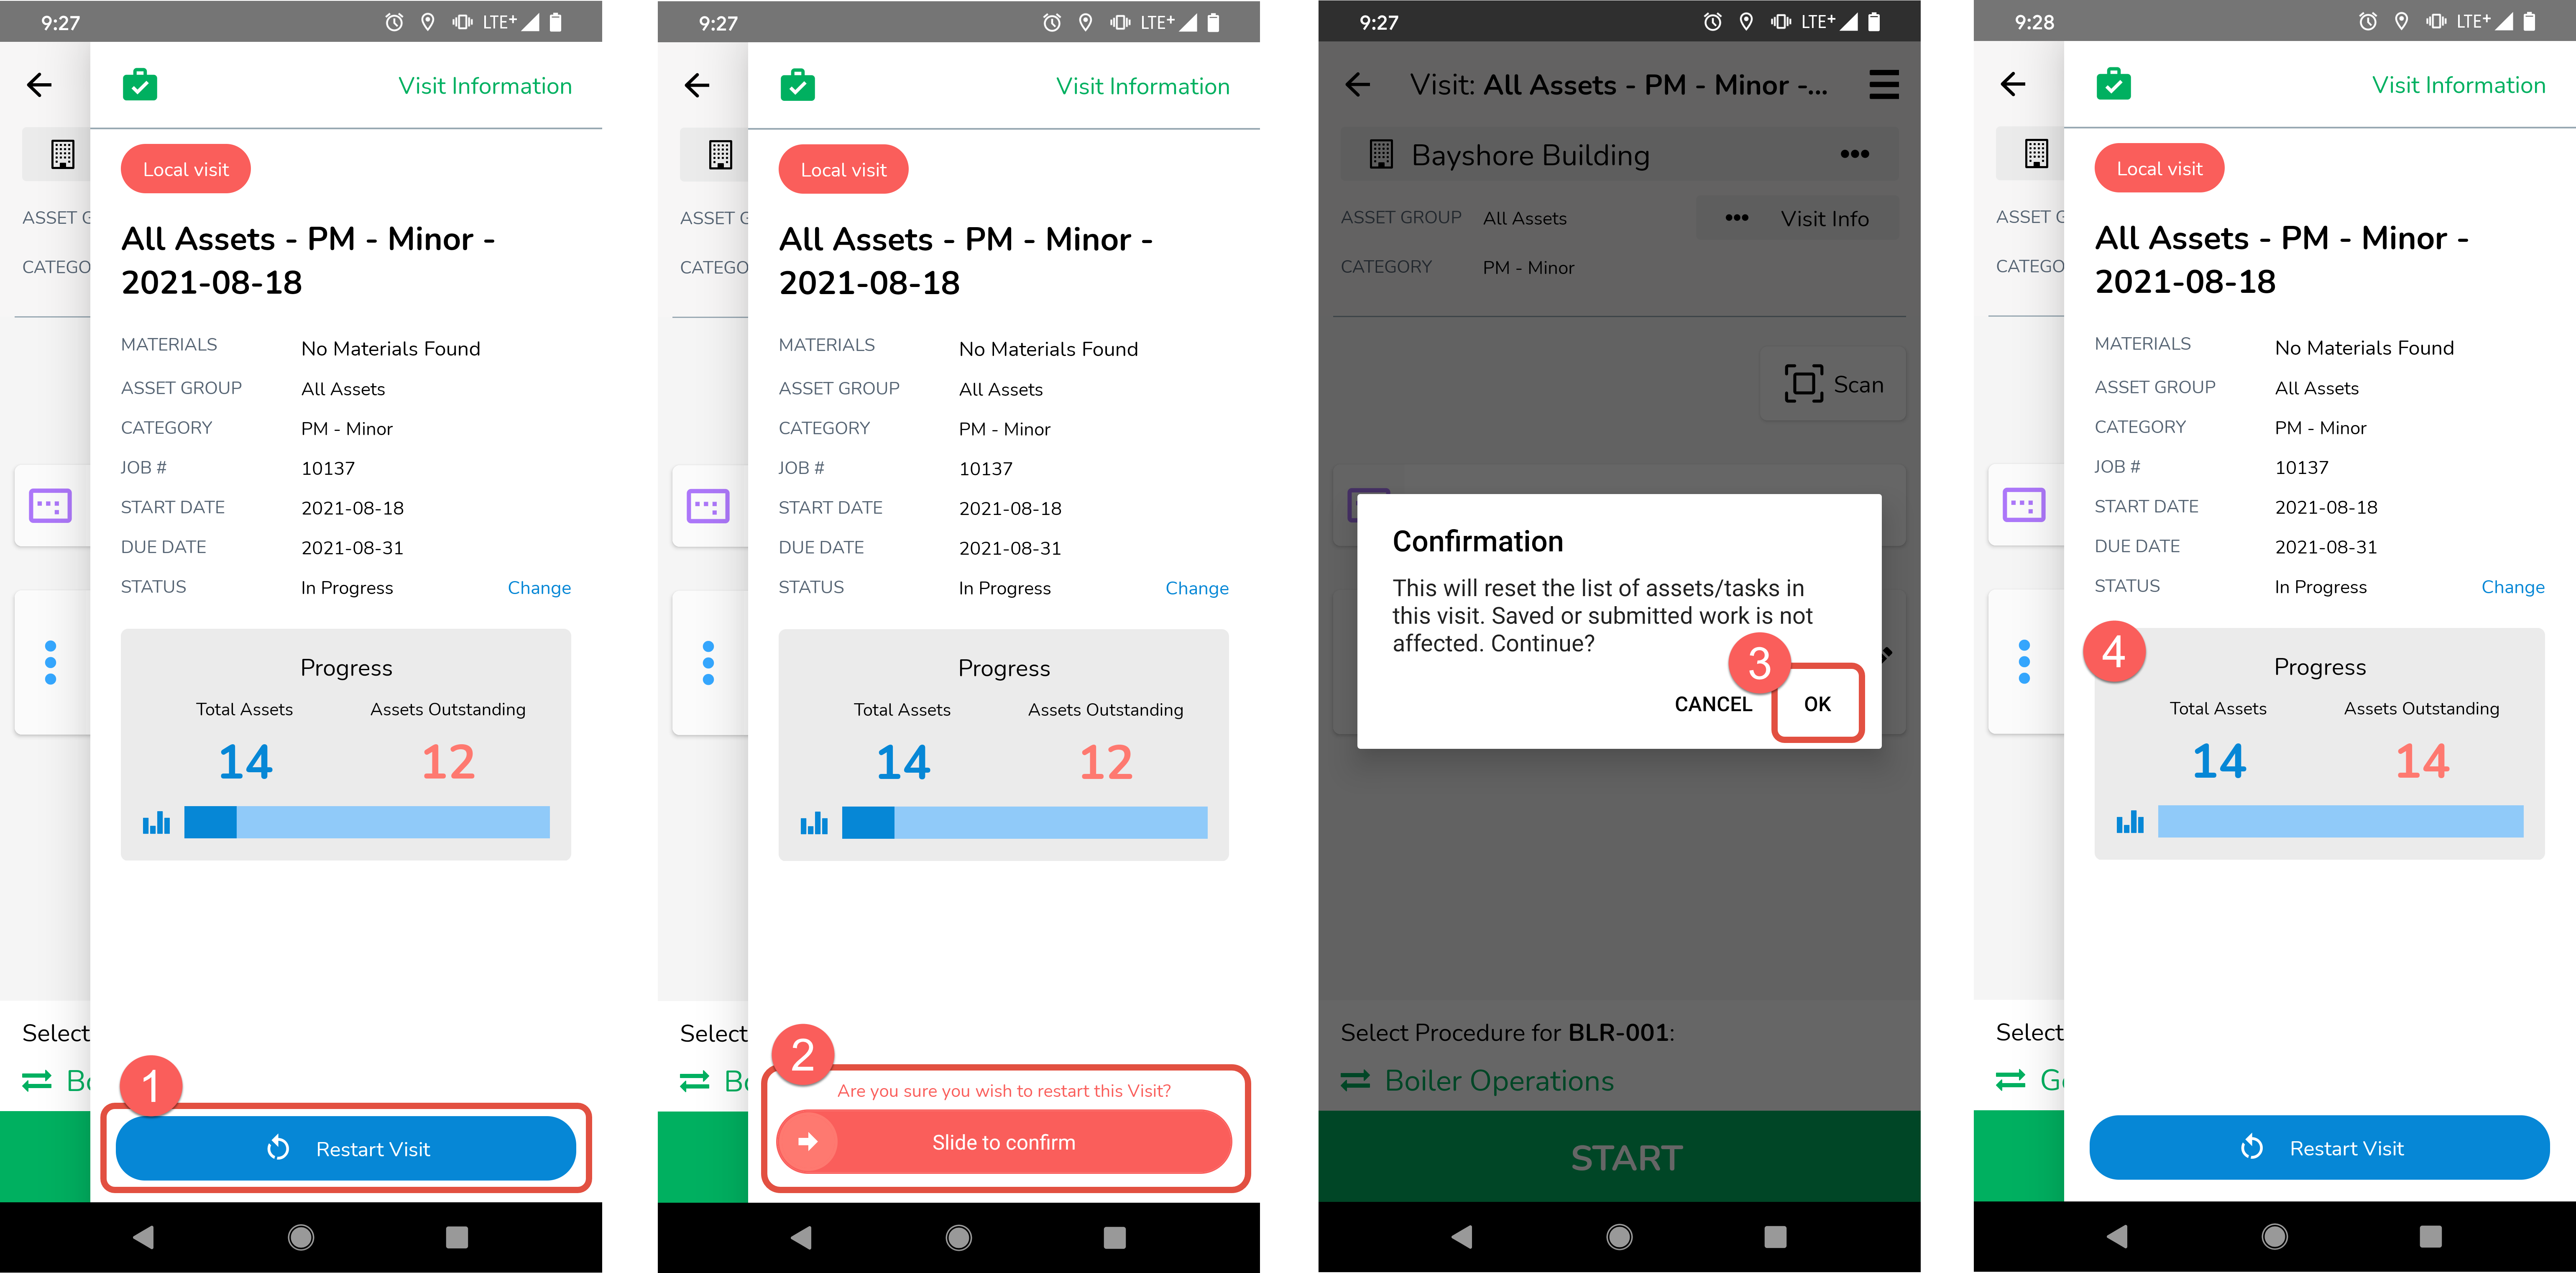
1 - Restart Visit
Tap the blue Restart Visit button at the bottom of the Visit Information screen.
2 - Confirm Restart
For added security, we have added a 2nd step where a red button labeled Slide to Confirm will appear. Using your finger, simply slide it from left to right.
3 - Final Confirmation
A 3rd confirmation will appear, explaining in detail what you are about to do. Tap OK to confirm and restart the visit.
4 - Visit has been reset!
As you can see in the Progress Tracker here, the visit has been reset by bringing back all of the assets (and tasks) that it originally started with.
Was this article helpful?