- 19 Apr 2024
- 1 Minute to read
- Print
- DarkLight
- PDF
How to add Time Entries
- Updated on 19 Apr 2024
- 1 Minute to read
- Print
- DarkLight
- PDF
How to Add Time Entries
This guide provides a detailed walk-through on adding time entries in the Admin Portal, which helps in tracking and managing work hours efficiently. Follow these steps to accurately record time details for various jobs performed.
Note:
Technicians can enter their Time Entries into the Admin Portal.
Step 1: Access the Time Entries Tab
Log into the Admin Portal: Start by logging into your Admin Portal with your credentials.
Navigate to Time Entries: On the left side of the dashboard, locate and click on the ‘Time Entries’ tab.

Step 2: Initiate Time Entry Addition
Click on the +Time Entry Button: To add a new time entry, click on the ‘+Time Entry’ button.
Step 3: Fill Out the Time Entry Form
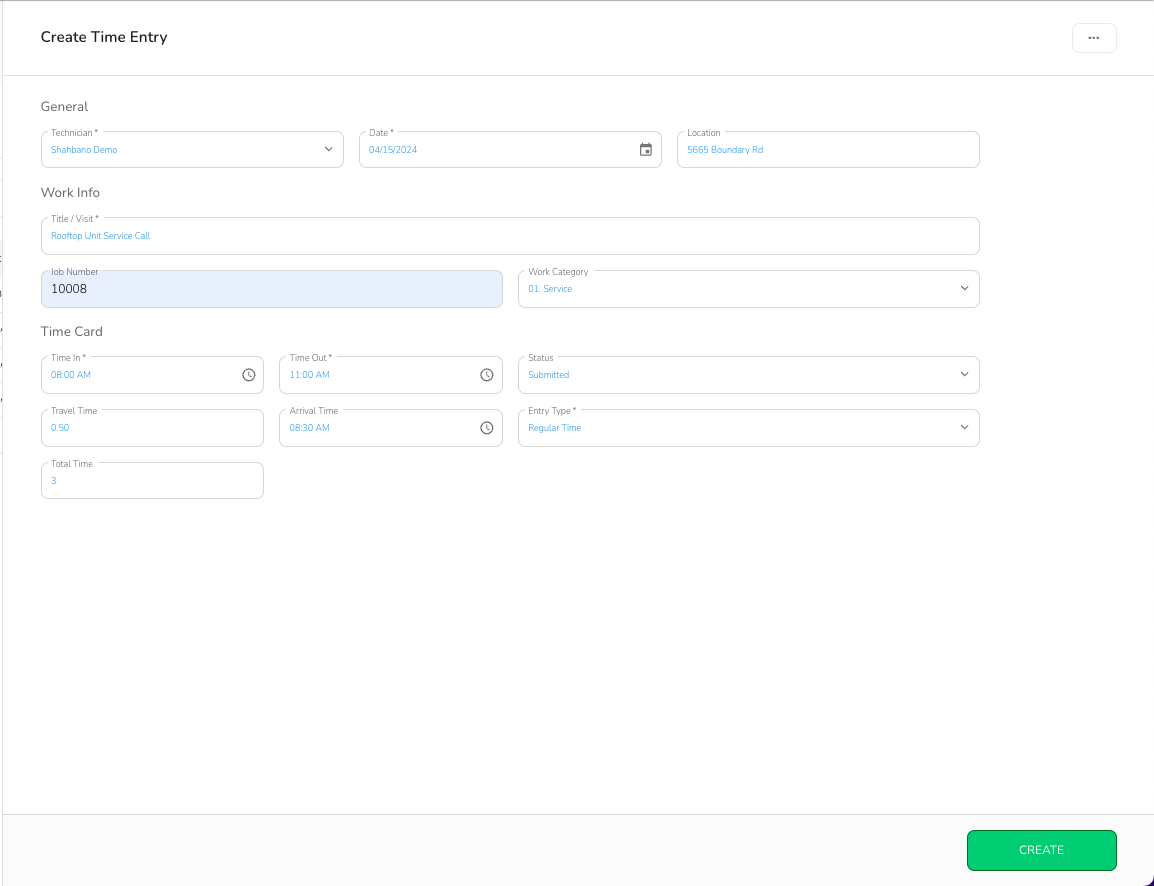
A slide-out form will appear on the screen. You will need to fill out several fields categorized into four sections:

General Information
Technician Name: Enter the name of the technician for whom the time entry is being recorded.
Date: Specify the date when the work was performed.
Location: Provide the address where the work was carried out.
Work Information
Title/Visit: Write a brief description of the work performed.
Job Number: Enter the job number associated with the work.
Work Category: Select the type of work performed from the drop-down menu.
Time Card Details
Time In: Enter the time when the technician started travelling to the work location.
Time Out: Enter the time when the work was completed.
Arrival Time: Specify when the technician arrived at the work location.
Travel Time: This field is automatically calculated based on the travel in and arrival times.
Entry Type: Choose the type of hours worked (e.g., Regular, Overtime, Double Time).
Total Time: This is automatically calculated based on the Time In and Time Out entries.
Step 4: Create the Time Entry
Review the Information: Before creating the entry, review all the details for accuracy.
Click Create: Once you have verified the information, click the ‘Create’ button to finalize the time entry.
Completion
Confirmation Notification: After clicking ‘Create’, you will receive a notification confirming that the time entry has been successfully added to the system.
View and Manage Entries: You can now view and manage, including editing this and other time entries within the Time Entries tab.


